Browse categories
Explore
Fiverr Pro
English
$
USD
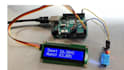
This Arduino Uno project measures temperature and humidity using the DHT11 or DHT22 sensor and displays the readings on an LCD screen or sends them to a computer via the Serial Monitor. This system can be used for home weather monitoring, greenhouse control, or any environment where tracking temperature and humidity is necessary.
Components Required
Circuit Diagram & Connections
Connecting DHT11/DHT22 to Arduino
DHT11/DHT22 PinArduino Uno PinVCC (+)5VData OutDigital Pin 2GND (-)GND
(Note: If using DHT22, a pull-up resistor (10KΩ) between VCC and Data is recommended for stable readings.)
Connecting LCD (Optional)
LCD PinArduino Uno PinVSSGNDVDD5VVOPotentiometer (for contrast)RSDigital Pin 12RWGNDEDigital Pin 11D4-D7Pins 5-8A (Backlight +)5VK (Backlight -)GND

Platform:
Arduino
Sensors:
Temperature
•
Humidity
Expertise:
Microcontrollers
•
IoT
•
Programming
What sensors can I use besides DHT11/DHT22?
BME280 (Measures temperature, humidity, and barometric pressure) AM2302 (Similar to DHT22 but with a different form factor) SHT31 (Higher accuracy, I2C communication) LM35 (Temperature only, analog output)
Why are my DHT sensor readings inaccurate?
Poor wiring (Check connections, ensure proper voltage) Sensor placement (Avoid direct sunlight, heat sources, or moisture) Library issues (Use the latest DHT sensor library from Adafruit) Sampling rate too fast (DHT11 needs at least 2 seconds between readings)
Can I use this without an LCD?
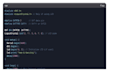
Yes! The project works with just the Serial Monitor (Arduino IDE → Tools → Serial Monitor). If you skip the LCD, remove the LiquidCrystal library and related code.
How do I power this project standalone (without a PC)?
Use a 9V battery + Arduino power jack Or a 5V USB power bank connected to the Arduino’s USB port For long-term use, consider a wall adapter (5V-9V, 1A+)
Can I use this with Arduino Nano/ESP32/Raspberry Pi?
Arduino Nano → Same code, just adjust pin numbers. ESP32/ESP8266 → Requires Wi-Fi setup (see FAQ #5). Raspberry Pi → Use Python + Adafruit_DHT library instead.


